Gold and metallic effects
Gold and metallic effects are a great way to embellish your RI projects by adding them the elegant touch of glamour. This is an ideal solution when decorating cookies for special occasions like birthdays, weddings or making Christmas tree ornaments.
There are three basic methods of making your icing gold/metallic:
- Painting it with luster dust mixed with high-proof alcohol. Luster dust is a shiny / metallic powder food color that contains, among others, a mica-based pearlescent pigments. This method is most effective at a relatively low cost, but requires a bit of practice and manual skills.

- Self-preparation of gold icing mix by adding a large amount of gold dust into the icing dyed mustard or yellow and applying it directly on a cookie. Unfortunately, this method is ineffective and expensive, since you have to add a lot of powdered dye in order to obtain shiny gold (achieving other colors is very hard) and the final outcome can be far from expected.
- Using ready-to-go gold icing available in online shops for cookiers (a good example can be a product offered by Evil Cake Genius). However, keep in mind that in case of this product getting the right consistency may be tricky. Also the structure of the icing is a bit different than usual, so it takes at least 2-3 times longer to dry than regular RI does. And last but not least: the prices of such products are not encouraging, so when you need large areas to be shiny gold, choose the first option.
How to use gold/luster dusts?
1. Fill a small container with a small amount of luster dust. Mix it with Everclear or strong vodka (use a medicine dropper). Alcohol is necessary because it transforms the powdered dye into a paint consistency. It evaporates very quickly, so it won’t dissolve the icing as you are applying the paint. The stronger the alcohol, the better.
2. Brush your luster dust paint over the icing with the appropriate sized brush. Use a fine-tipped brush for lettering or fine details and a wider brush for larger areas. Allow the luster dust to dry for about 20-30 minutes.
3. If necessary, apply a second coating of the paint. Layers of the paint can be added one on top of another until you reach the desired look, but allow each layer to dry before adding another.
- Be careful not to have too much liquid on your brush. Proceed as when applying a nail polish. Use the side of your bowl to take a little off before painting on the cookie.
- If you added too much paint, use a clean brush dipped in alcohol to swipe over the last coating. This acts as a paint thinner and will remove excess of luster dust.
- Once you’re finished, don’t throw out the leftover solution. Leave it as it is - the alcohol will evaporate leaving dry powder which you can store for future use.
You can also apply dry luster dust on your cookie for a toned down shimmer (a translucent effect). It leaves light pearly sheen on the surface allowing you to accent your creations. To do so, dip your dry brush in a luster dust, clean it off a little on parchment then brush it onto the cookie.
Note:
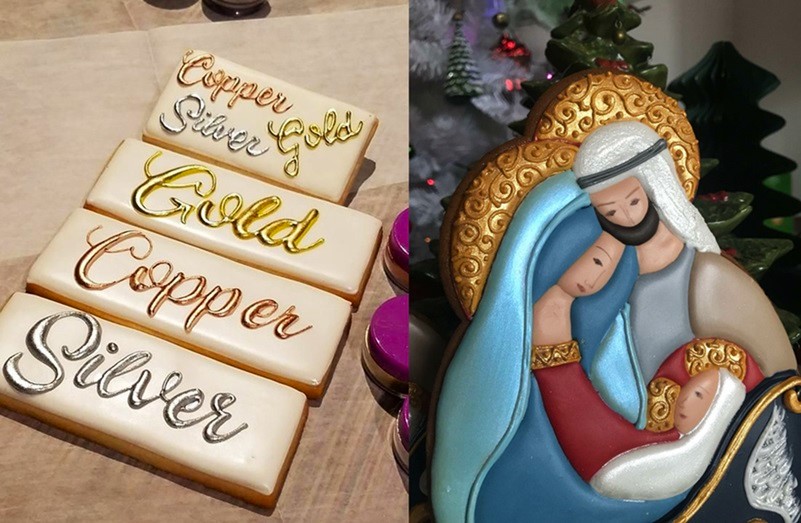
The final outcome depends on the color of your base icing. The same gold paint looks different when applied on white or yellow/mustard background: you'll need more layers on the white icing to get a full coverage. Using dyed icing underneath makes the color more intense and less translucent. See picture below:

If you prefer visual explanations over reading, watch this video by The Cake Decorating School explaining how to apply gold luster dust mixed with alcohol.
